Learn the Truth on How to Make a Bridal Bouquet with Roses (That Looks Like a Million Bucks in 2025!)
Table of Contents
If you’ve ever wondered how to make a bridal bouquet with roses, you’re in the right place! Creating your own bouquet is not only budget-friendly but also a fun, personal way to add an extra special touch to your wedding day. Plus, you get to brag about your newfound floral skills—bonus!
There’s something extra special about carrying a bridal bouquet you made with your own two hands. Not only does it add a personal touch to your wedding, but it also makes for an unforgettable DIY moment—one where you might (definitely) get covered in floral tape, but hey, that’s part of the fun!

Why Roses Are the Queen of Wedding Bouquets
How to make a bridal bouquet with roses is a skill worth learning because roses aren’t just romantic—they’re practically royalty in the world of wedding flowers. They’re timeless, come in nearly every color under the sun, and hold up beautifully throughout the big day. Plus, let’s be honest—nothing says “wedding” quite like a perfectly arranged bouquet of fresh, fragrant roses.
Whether you’re going for a classic all-white bouquet, a moody merlot mix, or a dreamy pastel creation, how to make a bridal bouquet with roses ensures versatility enough to make any vision a reality.

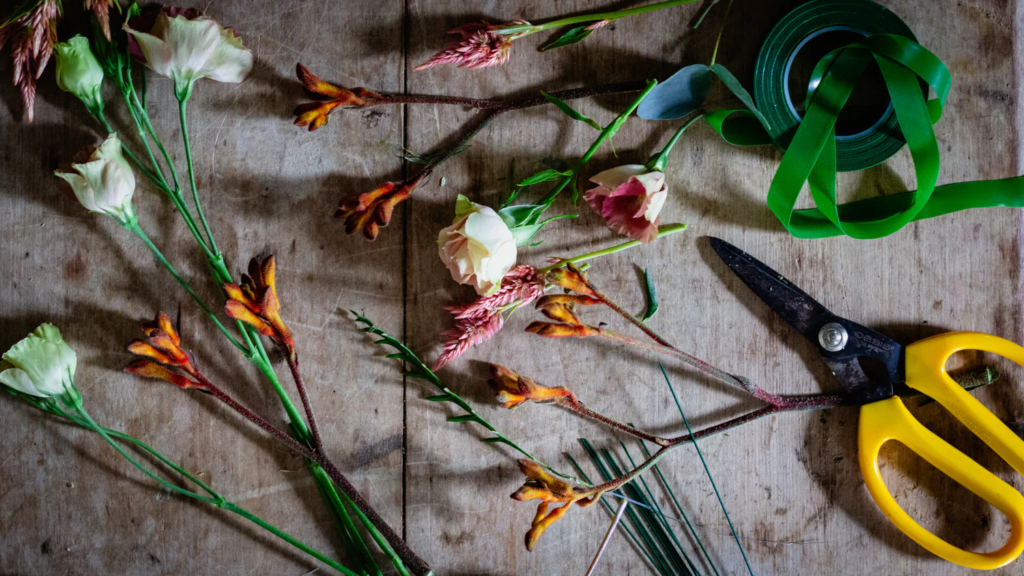
What You’ll Need to Make a Bridal Bouquet with Roses
Before you start playing florist, gather up these essentials:
Flowers & Greenery:
- Roses (24-36 stems) – Choose a mix of fully bloomed and slightly closed buds for texture and longevity.
- Greenery (eucalyptus, ruscus, ferns, or ivy) – Adds volume and contrast.
- Filler flowers (baby’s breath, wax flowers, or astilbe) – Optional but recommended for a soft, romantic look.
Tools & Supplies:
- Floral shears or scissors – Sharp ones! Your hands will thank you.
- Floral tape – Holds everything together before wrapping.
- Floral wire – Useful for reinforcing weak stems.
- Ribbon or lace – To wrap the bouquet handle.
- Straight pins – To secure the ribbon.
- Bucket of water – Keeps your flowers fresh while you work.
Now that we’ve got everything ready, let’s get into the fun part!
Step-by-Step Guide on How to Make a Bridal Bouquet with Roses
Step 1: Prep Your Flowers
Start by trimming your roses and greenery. Remove any leaves from the lower part of the stems (about 6 inches from the bottom) to make wrapping easier. If your roses have thorns, this is the time to remove them—your hands will appreciate it later!
Pro tip: Let your roses sit in a bucket of water for at least an hour before arranging. Hydrated flowers = happy flowers.
Step 2: Choose Your Focal Roses
Select 3-5 of the most stunning roses to be your bouquet’s focal point. These will be placed in the center, so pick the showstoppers! Hold them together in one hand at the height you want your bouquet to be.
Step 3: Start Building Your Bridal Bouquet with Roses
Add roses around your focal flowers, rotating the bouquet slightly after each addition. This ensures the bouquet stays rounded and balanced. Incorporate greenery and filler flowers as you go to create depth and texture.
Don’t overthink it! The goal is a natural, effortless arrangement (even if it takes a few tries to get there). How to make a bridal bouquet with roses is all about layering beautifully.
Step 4: Secure with Floral Tape
Once you’re happy with your arrangement, use floral tape to tightly wrap the stems about 4-5 inches from the top. This holds everything in place without being too stiff.
Step 5: Wrap with Ribbon
Take a beautiful ribbon (lace, satin, or velvet work great) and wrap it around the floral tape. Secure it with straight pins or a tiny dab of hot glue.
Step 6: Trim the Stems
Give the stems a final trim so they’re all even at the bottom. Ideally, they should be about 8-10 inches long, depending on your bouquet size.
Step 7: Store & Keep Fresh Until the Wedding
Place your bouquet in a vase with about an inch of water until it’s time to walk down the aisle. Keep it in a cool area to prevent wilting. How to make a bridal bouquet with roses includes knowing how to preserve its beauty!
Expert-Level Tips for the Perfect DIY Bridal Bouquet with Roses
- Mix rose sizes for a textured look – Using a combination of large, medium, and spray roses creates dimension.
- Stick to odd numbers – Odd numbers of flowers and greenery look more natural.
- Keep your stems clean – Too many leaves at the base = messy bouquet.
- Mist your bouquet – A light spritz of water keeps blooms fresh throughout the day.
- Add a personal touch – Incorporate sentimental elements, like a small charm or lace from a loved one’s wedding dress, for a meaningful touch.
- Experiment with fragrance – Different roses have unique scents, so pick ones that match your vibe (soft and powdery or bold and citrusy!).

FAQ: All Your Rose Bouquet Questions, Answered!
How long will my bouquet last?
If properly hydrated and stored in a cool area, your bouquet will last 24-48 hours before starting to wilt.
Can I make my bouquet the night before?
Absolutely! Just store it in water and mist it lightly to keep the roses perky.
What colors work best for a rose bridal bouquet?
Classic whites, blush pinks, and deep reds are always stunning, but don’t be afraid to go bold with bright or muted tones that match your wedding palette.
Do I need to use floral wire?
Only if some of your rose stems are weak or bending. Otherwise, floral tape and ribbon will do the trick.
Can I add other flowers to my rose bouquet?
Definitely! Mixing roses with peonies, ranunculus, or anemones can add more depth and uniqueness to your bouquet.
Ready to Create Your Dream Bridal Bouquet with Roses?
Crafting your own bridal bouquet with roses is an experience you’ll cherish forever (and brag about). Plus, the satisfaction of walking down the aisle with something you made? Unmatched.
Want even more wedding inspiration? Join our exclusive giveaways on Bridalsphere.com—where every entry gives you a better chance to win amazing wedding prizes! And who knows? You might just score something that makes your big day even more magical!
With this guide, you now know how to make a bridal bouquet with roses from start to finish. So grab those shears, get some roses, and let the floral magic happen! You can also email us at hello@bridalsphere.com.

